Showing posts with label gifts. Show all posts

Friday, June 28, 2013

Three-Picture Frame for Fathers' Day Gift

Three letters in the word DAD?  Three gorgeous kids?  A nice black frame with spaces for three pics?  Perfect Fathers' Day gift!  Well... the idea was brilliant.  The execution?  Not so easy.  Especially when I left the photography part to the last minute and only had a few minutes at a playground to get pictures of the kids holding their framed letters. 


I got several shots of Jack's tongue.  Six-year-old boys!

Kate was sweet as always.


Maggie, however, was soooo not into it. 
 
I believe she was saying "HERE!" in this shot, trying to give me back the frame.

These photos just crack me up.

Yes, that would be MY hand holding the frame.

Poor thing just wanted to go down the slide.


Ta-Da!  Our finished product.  Definitely not perfect.  Someday I'll replace the pictures with better ones.

Tuesday, June 18, 2013

Pirate Ship Applique T-Shirt

The kids and I went to a pirate-themed birthday party a few days ago.  Super fun: they got tattoos, dug for buried treasure, and came home with a load of salt water taffy.  I made the birthday boy, three-year-old David, a pirate ship-appliqued t-shirt.  I found the original idea here.  He--and his mom--loved it!


I used white "puffy paint" for the skull and crossbones.

Friday, May 24, 2013

Chalkboard-Paint Planters (as a Teacher Thank You Gift!)

Today is Jack's last day of kindergarten!  Of course the year has flown by.  As a thank-you gift to his teachers, I wanted to do something cute-yet-practical.  I've also been wanting to follow the chalkboard paint trend for quite awhile now.  So I picked up a couple terra cotta planters (about $2.47 at Home Depot) and some chalkboard paint (about $9.97, and I have plenty left over for future projects).  It only needed a couple coats to get the perfect black shine.  The planters took 48 hours to dry completely before we could use white chalk on them, and with that we just wrote a little "Thank You" and had Jack sign his name.  I filled them not with a plant but with a few little necessities: a pad of paper, pens, lotion, hand sanitizer, a small pack of tissue, and chocolate.  We'll deliver them today!


Friday, May 17, 2013

Mothers' Day Bouquets (Using Pool Noodles!)

Kate came home from Sunday School last Saturday with a bouquet of pool noodle flowers for me, and I thought it would be the perfect little gift to replicate for the kids' grandmas for Mothers' Day!  Here's how to do it:

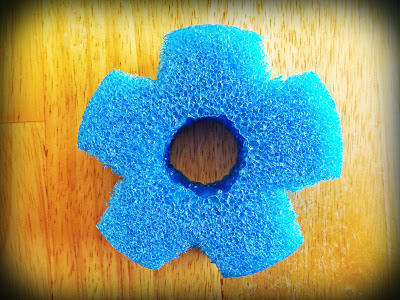
Slice off chunks from your pool noodles, about one inch wide.

Using a serrated knife, cut five notches around the sides of the noodle.  Don't cut too deep.

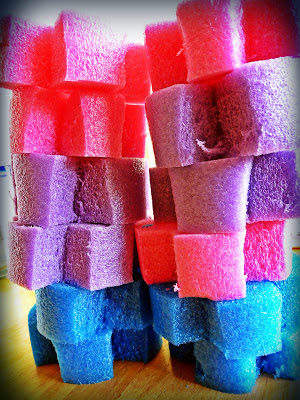
Our stack of flowers. 

Stick a green pipecleaner through each flower and tape leaves
on the stems.  And you're finished!

Wednesday, January 16, 2013

Pink, Black, and White Initial Onesie

Someone gave this adorable zebra-striped hat to Maggie with a 12-month-sized dress about a year ago.  I assumed the hat was also a 12-month size, but when she came 'round that age, the hat was way too puny for her gigantic head.  So she never got to wear it!  I decided to re-gift it to my friend Teresa and her baby girl Audrey, who should be born any day now.  I appliqued a matching initial onesie and made a hairbow to go along with it.  Little did I know that pink, black, and white were the colors of her baby shower, so it was perfect!


Wednesday, September 12, 2012

Fabric Flower Rosettes

My new craft obsession.  I've been making fabric flower rosettes (the tutorial I used was from this blog post).  They are surprisingly simple to make.  The first few I made were for our niece Loie's birthday present; I just attached them to alligator clips for a cute little hair accessory.  But I can think of a bunch of other ways they could be displayed as well. 

Friday, December 16, 2011

Cookies in a Jar

Hmmm... With Jack in preschool this year, it was the first time I had to come up with a teacher gift. I always loved the gifts my students and their parents gave me... and it truly WAS the thought that counted. I needed something both cute and practical. So, voila! I present to you Cookies in a Jar! I know, I know, it's nothing new to mankind, but it certainly was a new concept for me. We chose a Super Chocolate Cookies recipe and I sent my poor hubby out to three different stores to find 1-quart size jars. He grabbed the last set of jars at the last store; I guess my idea wasn't as novel as I'd originally thought! Jack helped me scoop the ingredients into the jars--it's a great gift idea for kids to help with. We cut some Christmas-y fabric to put over the top, tied it all with raffia, and attached the instructions. Sure hope they're good!


Recipe: Super Chocolate Cookies Mix (from my book Gifts in a Jar: Cookies, Brownies, and Bars)

1 1/2 c. all-purpose flour
1 c. packed light brown sugar
1 c. candy-coated chocolate pieces
(The recipe also calls for 1/2 c. each raisins and peanuts, but I left these out because of possible allergies and dislikes.)
1/4 c. unsweetened cocoa powder
1/4 tsp. baking soda
1/4 tsp. salt

1. Layer ingredients attractively in a 1-quart food storage jar with tight-fitting lid. Pack ingredients down slightly before adding another layer.
2. Cover top of jar with fabric; attach instructions/gift tag with raffia or ribbon.

Instructions to attach:

2/3 c. butter, softened
2 eggs
1 1/2 tsp. vanilla
1 jar Super Chocolate Cookies Mix

1. Preheat oven to 350 degrees.
2. Beat butter in large bowl until smooth. Beat in eggs and vanilla until blended. (Mixture may appear curdled.) Add cookie mix to butter mixture; stir until well-blended.
3. Drop heaping tablespoonfuls of dough 2 inches apart onto ungreased cookie sheets. Bake 11 to 12 minutes or until almost set. Let cookies stand on cookie sheets 2 minutes. Remove cookies to wire racks to cool completely.
Makes 2 dozen.

Monday, October 17, 2011

Appliqued Onesies

We've been in our new house for six months, baby Maggie is four months and sleeping well most nights, and I am officially back in crafting mode. Two friends recently had their own babies, and so a couple appliqued onesie gifts were in order. One boy, one girl: